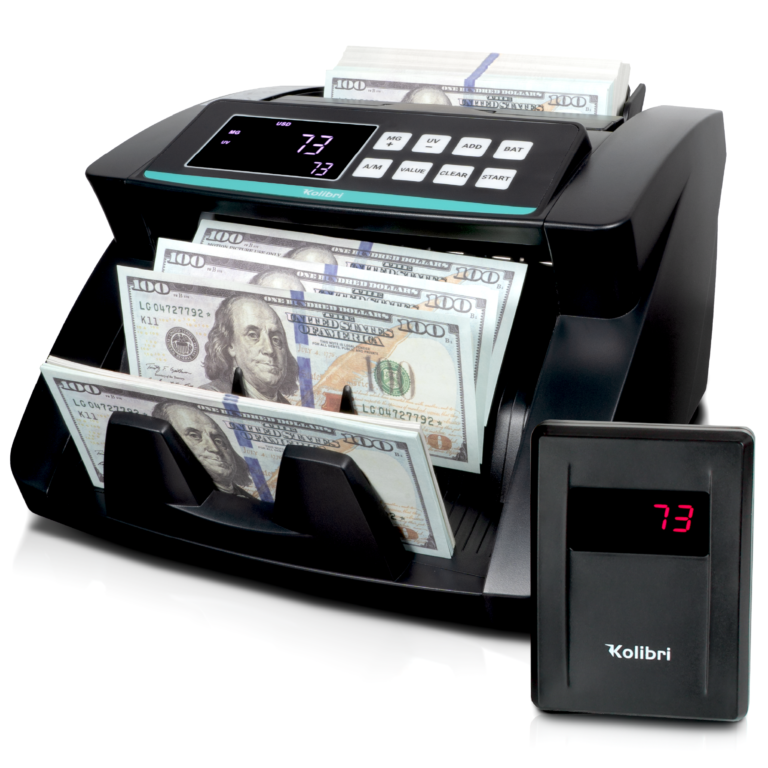
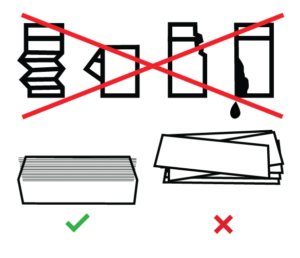
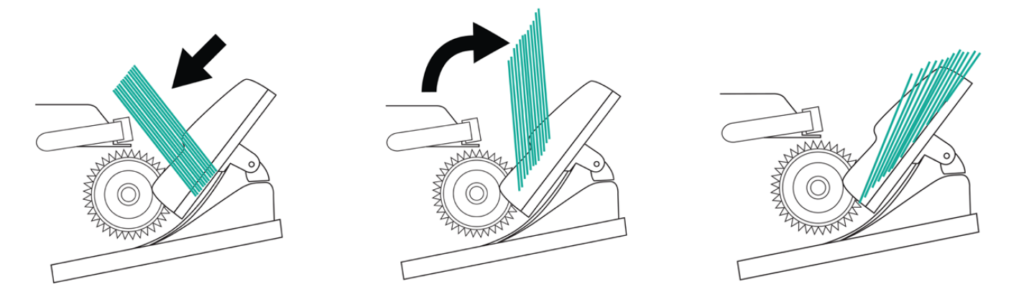
In order to avoid jams, it is important to correctly load the hopper. Kolibri recommends not to use more than 200 bills at a time. Follow the 3-step loading technique below to ensure smooth bill feeding.
The unit has fast moving parts and may be hazardous if fingers, hair, clothes, etc. get near the fast moving parts. Please be mindful of loose clothes, hair or fingers coming too close to the fast moving parts.
STEP 1:
Correct or remove the bills that are severely wrinkled, damaged or folded. Square the bill stack.
STEP 2:
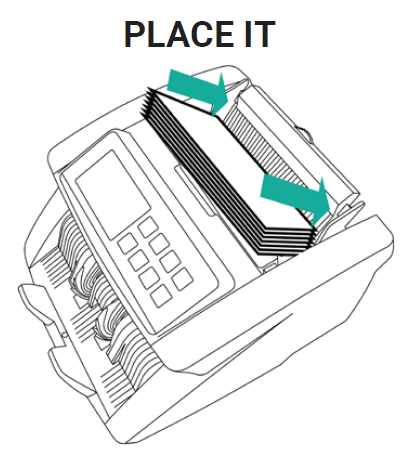
Place the bill stack on the carrying handle, with the bottom of the stack touching the bill guide plate. As it is shown in the illustration.
STEP 3:
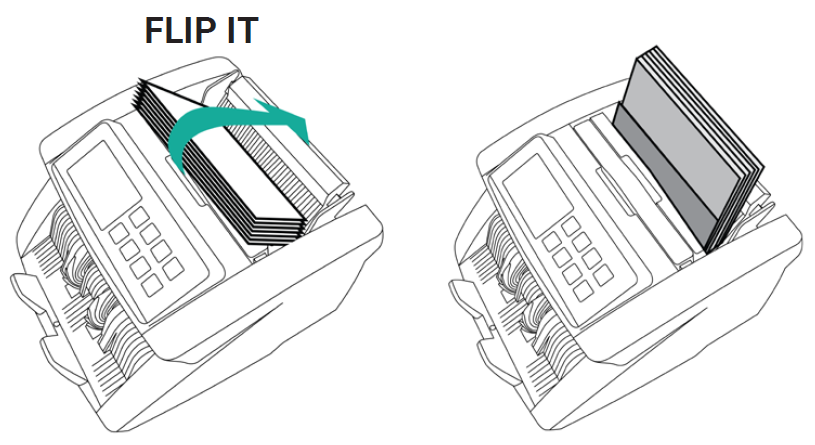
Flip the bill stack towards the rear of the machine so the stack is now leaning against the bill guide plate The bills will begin counting automatically (unless in manual mode).
Below is a side view of the bill loading technique. All bills must be between the rollers and the feeding plate to be counted smoothly.
ATTENTION: Always power off the unit and disconnect from power source before cleaning.
Most operational problems can be avoided by regular care and preventative maintenance. Taking regular care of the Kolibri Bill Counter will significantly increase its lifetime.
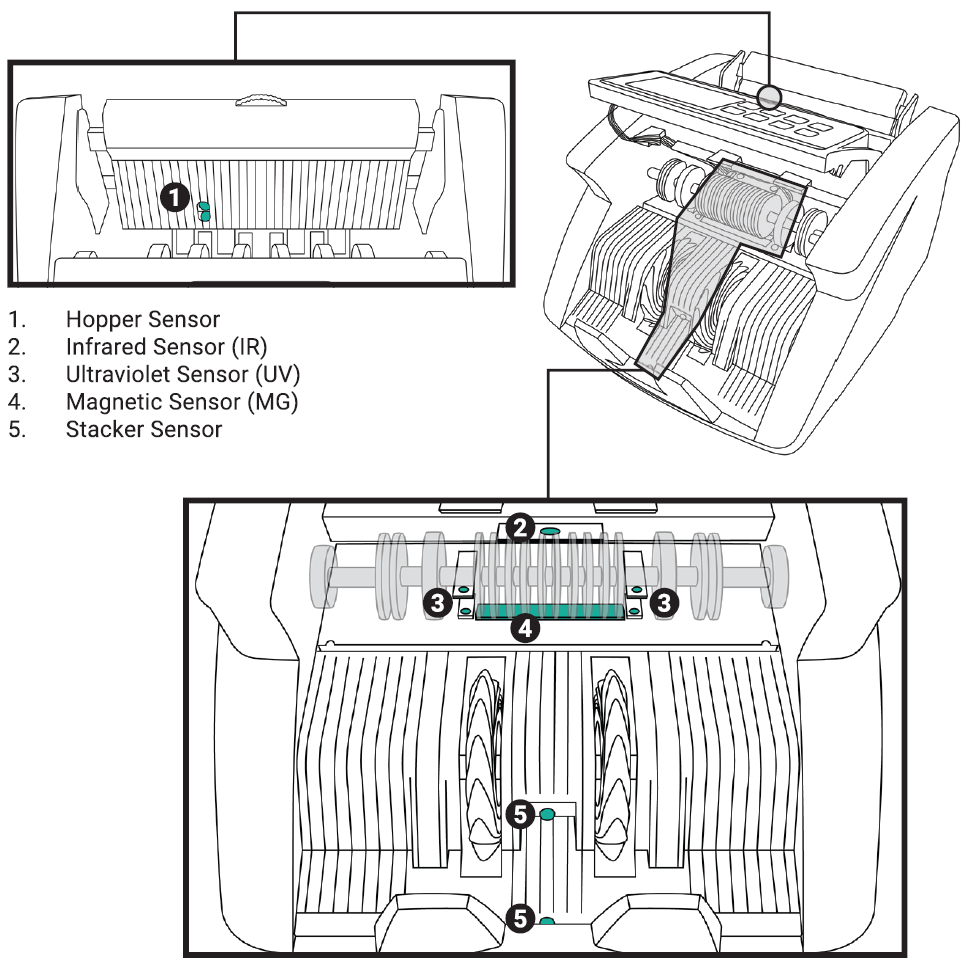
All parts of the Kolibri Bill Counter need daily care and cleaning. Pay closed attention to the sensors, which are delicate components. If dust or other foreign matter adheres to the sensors, it may cause various problems during operation of the machine. Dirty sensors can affect the Kolibri’s Bill Counter’s performance and cause genuine bills to be rejected. It is suggested that the user performs weekly maintenance on the unit to maintain top performance.
For best results, it is recommended to use an air duster and a soft bristle brush to remove any dusy or debris from the interior of the unit. When not using the machine for an extended period, cover it with the provided dust cover to prevent dust from settling inside.
- To avoid malfunction caused by foreign objects, please clean your machine frequently.
- Clean Hopper and Stacker sensors with the provided soft bristle brush or a dry cloth frequently.
- Clean the detection sensors with the provided soft bristle brush or a dry cloth frequently.
- Rubber rollers may be cleaned with a slightly damp cloth. You may use a small amount of isopropyl alcohol to dampen the cloth and clean the rollers. Wait until the rollers are completely dry before turning on the machine.
- Place fingers under control panel and thumbs on the side panels.
- Lift control panel about 2 inches.
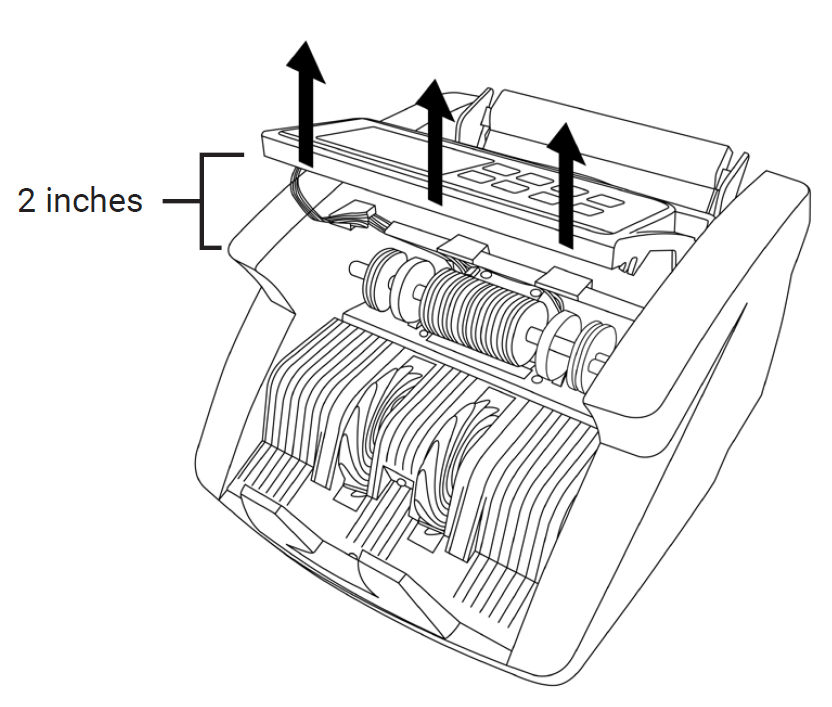
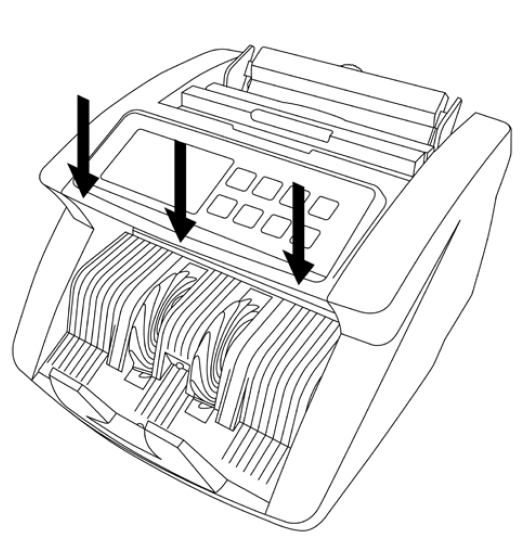
- Secure sensor housing and control panel back to the initial position.
To enter the sensitivity settings menu, press and hold the “MG+” and “BAT” buttons for 3 seconds, or until “-C00” code displays in the bottom right corner of the screen. Use the “BAT” or “START” buttons to cycle through the different codes (refer to the Sensitivity Codes Table). When on the desired code you can use the “MG+” or “UV-” buttons to adjust the settings accordingly. the “UV-” button to adjust the settings accordingly. Once adjusted, place a finger on the hopper sensor to save and exit the sensitivity settings menu. If the hopper sensor does not trigger, ensure the machine is in “AUTO” start mode before triggering the hopper sensor. Codes are listed below for reference.
Error Codes:
Code | Detail | Setting | Adjustment |
C00
| Voice Switch | 0 | 0 = off / 1 = on
|
H-C01 | Voice Volume | 1 | 0 = off / larger number = louder sound
|
-C04 | External Display | 1 | 0 = off / 1 = on |
H-C07 | Stop Time | 40 | larger number = quicker stop |
-C08 | Alarm Last Time | 0 | 0 = shut / 1 = open |
H-C09 | Hopper Sensor Sensitivity | 150 | smaller number = higher sensitivity |
H-C10 | Stacker Sensor Sensitivity | 125 | larger number = higher sensitivity |
-C24 | Double Note Sensitivity | 20 | larger number = higher sensitivity |
-C25 | UV Sensor Sensitivity | 120 | 0 = close / larger number = higher sensitivity |
-C26 | MG Sensor Sensitivity | 10 | 0 = close / larger number = higher sensitivity
|
-C28 | Counting Threshold | 220 |
|
-C35 | Button Beep | 1 | 0 = off / 1 = on |
Other Error Codes:
Error Message | Cause | Solution |
E01 | Suspect bill detected by ultraviolet detection or UV detection issue. | Remove top bill from stacker. This bill is not added to count. Press start to continue. |
E02 | Suspect bill detected by magnetic detection or MG detection issue. | Remove top bill from stacker. This bill is not added to count. Press start to continue.
|
CHn | Two or more bills passed as one. | Ensure bills are loaded properly. Remove all bills from stacker. Bills are not added to the total count. Recount.
|
HLF | The last counted bill does not confirm size of the bill or the bill might be torn or folded. | Ensure top bills in the stacker are standard size and or not folded. Remove all bills from stacker. Bills are not added to the total count. Recount. |
Other Error Messages:
Error Message | Cause | Solution |
dbL | The last counted bill is a double note or has double detection issue. | Ensure top bills in stacker are not stuck together. Remove all bills from stacker. Bills are not added to the total count. Recount.
|
FE3 | Issue with the left counting sensor. | Clean the sensor. See section 5.1 of the Kolibri User Manual Maintenance for location of sensors.
Contact Kolibri’s technical service center if issue persists (Refer to section 5.6 of the Kolibri User Manual). |
FE2 | Issue with the right counting sensor.
| Clean the sensor. See section 5.1 of the Kolibri User Manual Maintenance for location of sensors.
Contact Kolibri’s technical service center if issue persists (Refer to section 5.6 of the Kolibri User Manual).
|
FE7 | Issue with the encoder sensor. | Clean the sensor. See section 5.1 of the Kolibri User Manual Maintenance for location of sensors.
Contact Kolibri’s technical service center if issue persists (Refer to section 5.6 of the Kolibri User Manual).
|
FE1 | Issue with the feeding sensor. | Clean the sensor. See section 5.1 of the Kolibri User Manual Maintenance for location of sensors.
Contact Kolibri’s technical service center if issue persists (Refer to section 5.6 of the Kolibri User Manual).
|
FE6 | Issue with the stacker sensor. | Clean the sensor. See section 5.1 of the Kolibri User Manual Maintenance for location of sensors.
Contact Kolibri’s technical service center if issue persists (Refer to section 5.6 of the Kolibri User Manual).
|
FEA | Issue with the UV sensor. | Clean the sensor. See section 5.1 of the Kolibri User Manual Maintenance for location of sensors.
Contact Kolibri’s technical service center if issue persists (Refer to section 5.6 of the Kolibri User Manual).
|
Other Error Messages:
Problem Description | Cause/Action |
Machine does not turn on. | 1. Ensure the power cord is connected properly. 2. Check fuse in the fuse compartment and replace it if necessary. 3. Contact Kolibri’s technical service center if the issue persists. |
Machine incorrectly detecting counterfeit notes. | 1. Ensure that the bills were correctly loaded into the hopper. 2. Turn the machine off and on again. 3. Ensure the feed gap of the machine is correct (Refer to section 5.2 of the Kolibri User Manual). 4. Contact Kolibri’s technical service center if the issue persists. |
Bills are jammed. | 1. Turn off the machine and remove any jammed bills. 2. Look for and remove any foreign objects inside the unit (paper clips, rubber bands, etc.). |
Sometimes, during the transportation or shipment of the unit, the adjustments of the feed mechanism may loosen. This can also happen during normal wear and tear, and can lead to DOUBLE/CHAIN errors.
The feed gap is the actual height of the bill feed path and should be adjusted to the thickness of a single bill. If the feed gap is too wide, the user may experience a high amount of DOUBLE/CHAIN errors which are caused by more than one bill entering the scanning path at one time. If the feed gap is too tight, the unit may not be able to pass bills into the scanning path or catch on bills and tear them.
To adjust the feed gap properly, you will need a philips screwdriver (not included).
- Ensure the machine is turned off.
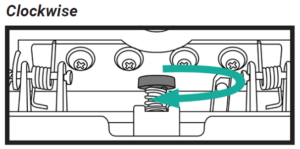
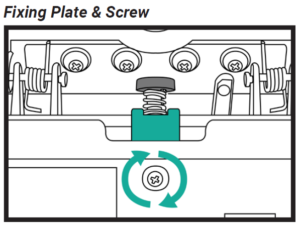
- Locate the feed gap adjustment knob (green) and the fixing plate screw (green circle) at the back of the machine (loosen before performing any adjustment)
3a. If more than one bill is being pulled into the feed mechanism (Double/Chain errors), turn the knob clockwise (decrease gap) Adjust 1 turn, then re-test the machine to see if the problem is corrected. Repeat if Necessary.
NOTE: If the feed gap is adjusted too narrow, chain error, bill jams and tears can occur.
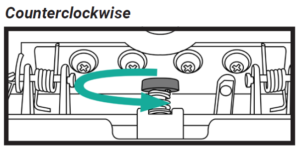
3b. If Chain error or bill jamming is seen on the input, turn the knob counterclockwise (increase gap). Adjust 1 turn, then re-test the machine. Repeat as necessary.
NOTE: If the feed gap is adjusted too wide, double and half errors can occur.
- Fix the adjusted position by tightening (clockwise) the fixing plate screw.
IMPORTANT NOTE:
The Kolibri Bill Counter’s feed gap adjustment can be sensitive during adjustments. DO NOT overturn each adjustment or you may overshoot the optimum gap. We recommend testing with a stack of bills after each adjustment turn.